What you need
To begin, you will need the following:
- A personal user account in Jiglu with its username and password.
- The system administrator password for this account. In order to provide additional protection, access to modify users and system settings requires users to enter an additional password. This will be requested by the system when required or alternatively you can give yourself these additional rights by opening the pop-up menu next to your name at the top of each page and choosing the Administrator log in After you have done this the user menu icon on the right of the navigation bar will change to a red border.
If you have just installed the software or launched a Jiglu AWS instance then you will need to have followed the instructions in Accessing Jiglu for the first time. If you have a hosted service then you will have been given your username, initial password and your system administrator password.
You should now log in to the Jiglu system at its URL.
First actions
Setting new passwords
If you did not create your user account yourself then you should first change your password. Open the pop-up menu next to your name at the top of the page and choose the My preferences option. Next, choose the Change password option and enter your new password. Note that if access to Jiglu is controlled using an external directory server (like Microsoft Exchange or another LDAP server), then you will not have the option to change your password here.
You should now set your system administrator password. From the My preferences page choose the Change system administrator password option. This password must have a strong strength to be acceptable – the page will tell you if it does not.
Setting licence key
A newly installed Jiglu system will allow up to ten users and ten groups of all types (blogs, monitors and spaces). If you have purchased a licence then you can enter the licence key to raise these limits by choosing the Settings tab and then the Licence key option.
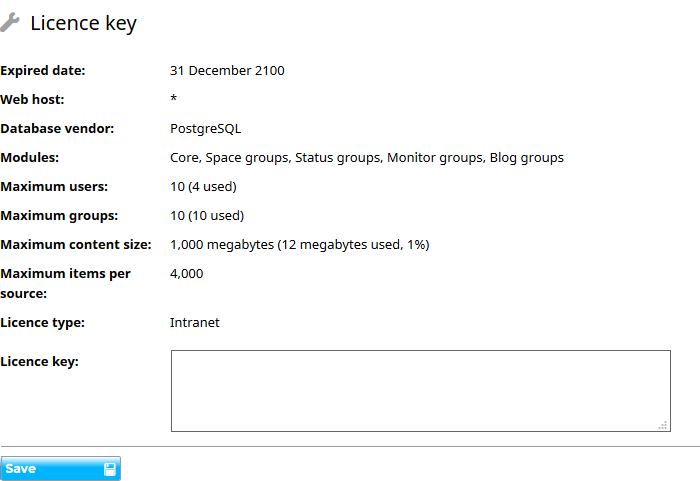
On a single server system the new licence key will immediately be active. In a system where components are distributed across multiple machines it will be necessary to restart each of the Jiglu servers for the change to be consistently applied across all the servers.
Customising your system
Jiglu offers considerable control over the look and operation of the system. The following areas can be considered:
- System identity - what your system is called.
- Appearance - how the system looks.
- System policies and notices - what registration terms and conditions you want users bound by.
- Analytics - how to integrate with external page analytics, like Google Analytics.
- New user creation - whether users are allowed to register and if they need approval.
- User security, defaults and limits - default preferences and restrictions applied to users.
- User profiles - information held about users.
- New group creation - what users can create new groups and if they require approval.
- Group defaults - what settings are available for groups and their defaults.
- Privacy - how to limit what personal user information is available to others.
System identity
The basic identity settings of the system can be configured by choosing the Settings tab and then the System identity option.
Your system will need a name. This will appear in emails from the system and on some web page elements. Emails from the system will have a short identifier at the start of the subject which can also be set here. This allows recipients to more easily filter messages should they wish. A description of the system can also be set here, which will appear in metadata for the system’s home page.
Appearance
A number of settings categories control how the system will appear to users. First you will want to choose the look and location in the Appearance settings page.
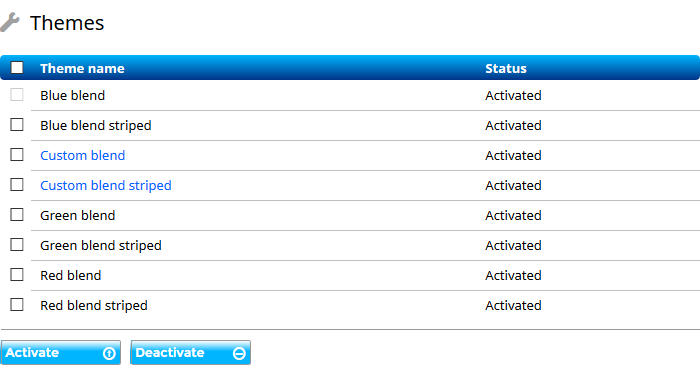
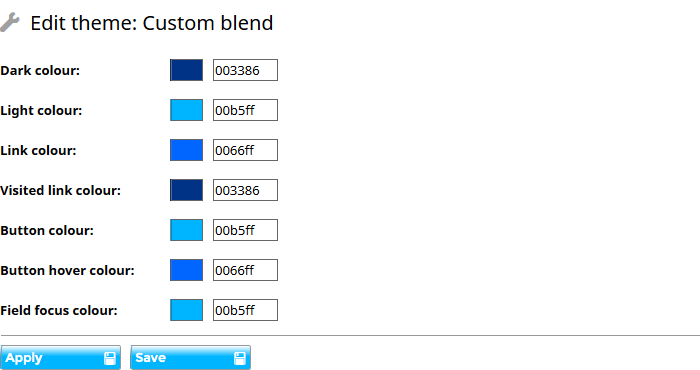
Jiglu comes with six fixed and two customisable themes. You can either choose from three base colour variants – blue, green and red – or select your own colours in a customisable theme to match your organisation’s own branding.
For each colour there are then two variants. The ‘blend’ variant uses a line between each item on index pages and lists of items. The ‘blend striped’ variant uses alternating grey backgrounds for each item instead. Groups have the ability to choose their own themes. If you want to limit this then you can deactivate themes on the Themes settings page.
The time zone will allow you to choose the correct time for your location. The locale will let you make a choice of UK or US English – this will affect the text of the web site and emails and also the processing of content, such as determining dates. Users can also set their own time zone and locale, which will take precedence over the system ones when they view the system, though within a group everything will be consistent with the group's own time zone and locale.
On the Banner images settings page you can upload images to set the branding for your site. The following images can be used:
- System page banner – the banner that will appear at the top of all pages If you do not upload a banner then the Jiglu logo will be used.
- System icon – a square icon that will be used for browser tabs, bookmarks and notifications. If you do not upload an icon then the Jiglu man icon will be used.
When you want to make more radical changes than customising the theme colours, you can also use a stylesheet by choosing the Stylesheet settings page. This could be used to change any other aspect of the system look.
By default, when a user visits a Jiglu site without having logged in they will be presented with a log in form. If instead you want to give them information about the system you can do so by going to the Public home page settings page. Here you can set what those users will see, with any information they might need about the system before they log in or register.
System policies and notices
Any system, whether used internally or externally, will need to inform users of the terms and conditions of using the system and how their data is used. You can do this by going to the System policies settings page. Here you can also enter contact information for the administrators of the system and a log in message that will be shown on the form when users log in.
If users are allowed to register to use the system then they will be asked to accept them as part of the registration form. You may also want to link to them in the footer of pages on the site. By going to the Page elements settings page you can set what you want to appear in the footer at system level and when a page is viewed inside a blog or space. If you want to link to the policy pages:
- Registration terms are at https://(your-domain)/+terms
- Privacy policy is at https://(your-domain)/+privacy
- Contact information is at https://(your-domain)/+contact
If you want to set a standard footer that appears in all emails from the system then go to the Email processing settings page and enter the text in the Footer field.
There may be notices that you want to inform users of. On the Notices settings page you can enter short notices that appear on the log in form and once a user has logged in plus a longer notice that can appear on the user’s personal Radar home page.
Analytics
Jiglu integrates with standard web page analytics systems, such as Google Analytics. These will generate a fragment of JavaScript to use on the page which should be posted into the Custom JavaScript field on the Page elements settings page. You will also need to list the domains from which JavaScript is allowed in the Custom JavaScript domains setting.
New user creation
There are four main scenarios for user creation in Jiglu:
- The system is connected to an external directory, such as Microsoft Exchange or another LDAP server. In this case it will only be possible to register users from that directory to use the Jiglu system.
- Only system administrators are able to add new users.
- Anyone with access can register to use the system. They may optionally then require approval from a system administrator before they can log in.
- Those who are users of the system may invite others to register to use the system and join a specific group. They may optionally then require approval from a system administrator before they can log in.
When not connected to a directory server, there are two key controls over how users can register in the system:
- In the Permissions settings page for Users, if you give the Add permission to the Guest user then any user will be able to register to use the system. If the Guest user does not have the Add permission but the Registered user does then users who are invited by a group member will be able to register to use the system. If neither of these roles has the Add permission then external registration is not allowed and only system administrators will be able to add new users.
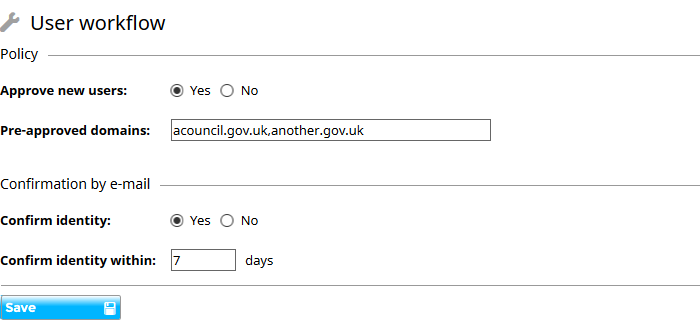
- In the Workflow settings page for Users, if you change Approve new users to Yes then you can still allow users to self-register but they will need approval from a system administrator first before their account becomes active and they are able to log in. Tasks to approve new users will appear in My tasks for those users with permission to activate users. There is also the option in user workflow to set a list of email domains that can skip the approval stage – for example those within an organisation.
If you want to allow only certain users to create new users but do not want them to have full system administrator rights then you can do so by creating a new role.
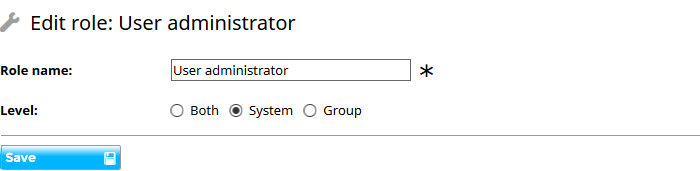
On the Roles settings page choose the New button and add a new system role with a suitable name, such as ‘User administrator’. On the Permissions settings page for Users give the Add permission to this new ‘User administrator’ role. If you want them to be able to approve new users, edit users or deactivate users then give them those permissions as well. Now find the required users in the user index, edit them and give them the ‘User administrator’ role.
User security, defaults and limits
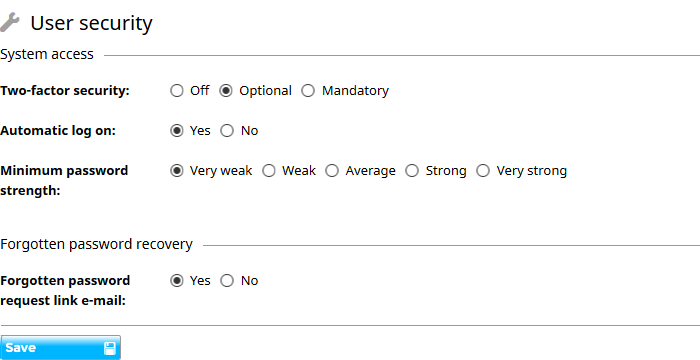
Jiglu’s user security is by default set for a typical environment, allowing optional two-factor security and automatic log in through browser cookies plus, when an LDAP directory server is not in use, basic password complexity and the ability to retrieve a forgotten password over email. These can be changed when required options which while less convenient for users may be necessary to fit in with local security policies.
When a new user is created a number of preferences will be set for them. You can change the defaults for some of these preferences by going to the User defaults settings category. For example, if you want users to be able to compose HTML discussion messages and blog comments by default then you may want to change the default for this preference to HTML editor.
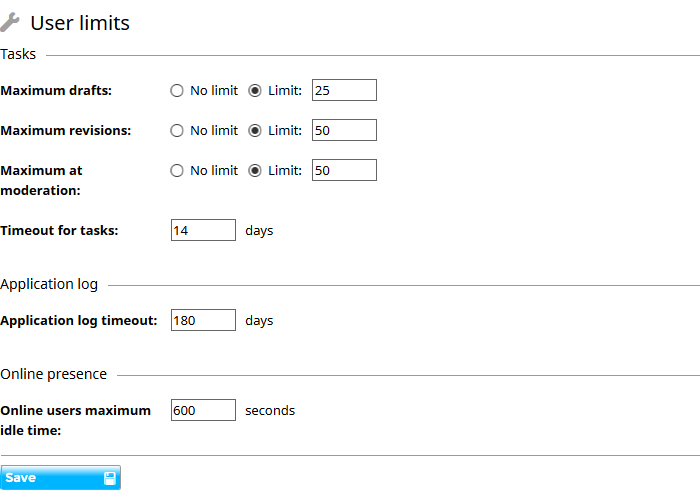
In the User limits category you will find controls over what users can do. These include:
- Whether they are allowed to log in automatically and whether they can have a link to change their password sent to them by email when they have forgotten the password.
- Controls over how many draft contributions they can create, so they don’t tie up resources unnecessarily.
- How long tasks and application log entries are held for a user.
User profiles
There may be additional information that you would like to capture in users’ profiles, for example what their job title is or a brief summary of their work experience. You can do this by going to the Profile headings settings category and adding a new heading under which you want them to add information.
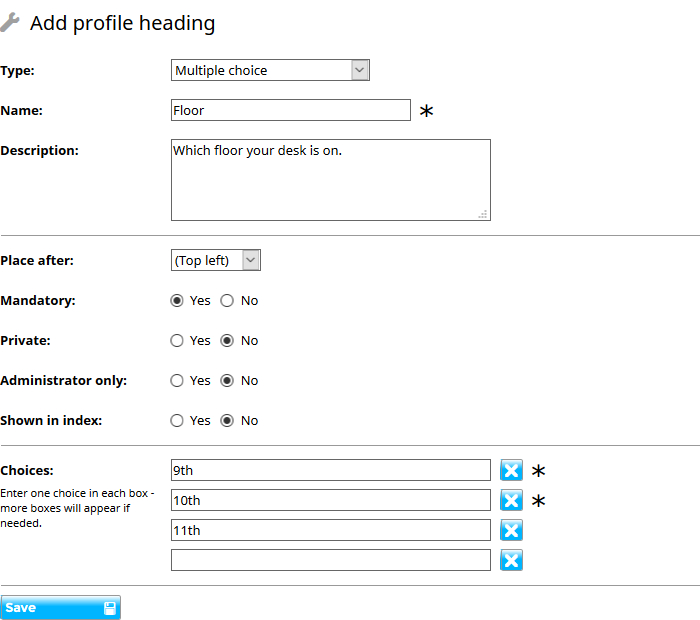
There are a number of different types of heading, from simple lines of text to multiple choice entries. You can also choose whether to have information only set by an administrator, whether it is private or published and whether to show it in the user index as well as on the profile page.
New group creation
By default anyone that is a registered user can create a new blog, monitor or space. However, controls are available to change this when required:
- In the Permissions settings page for All groups, if you remove the Add permission from Registered user then ordinary users will no longer be able to add groups. With no add permission set only system administrators will be able to add new groups.
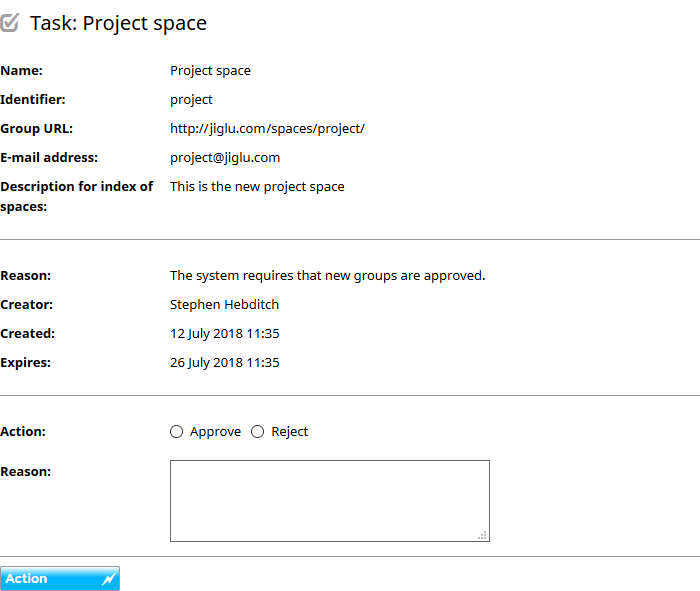
- In the Workflow settings page for Groups, if you change Approve new users to Yes then you can still allow users to create groups but they will need approval from a system administrator first before their group becomes active and they are able to access it. Tasks to approve new groups will appear in My tasks for those users with permission to activate groups.
If you want to allow only certain users to create new groups but do not want them to have full system administrator rights then you can do so by creating a new role. On the Roles settings page choose the New button and add a new system role with a suitable name, such as ‘Group administrator’. On the Permissions settings page for All groups give the Add permission to this new ‘Group administrator’ role. If you want them to be able to approve new groups or delete groups then give them those permissions as well. Now find the required users in the user index, edit the user and give them the ‘Group administrator’ role.
Group defaults
In the Group defaults settings pages you can control what settings groups are allowed to change, what their default values are and what limits are placed on groups.
- To change what settings categories are visible in a group, select the Category visibility This can be useful to simplify what is available for the average group. For example, the privacy, notifications and tagging categories may be better made invisible.
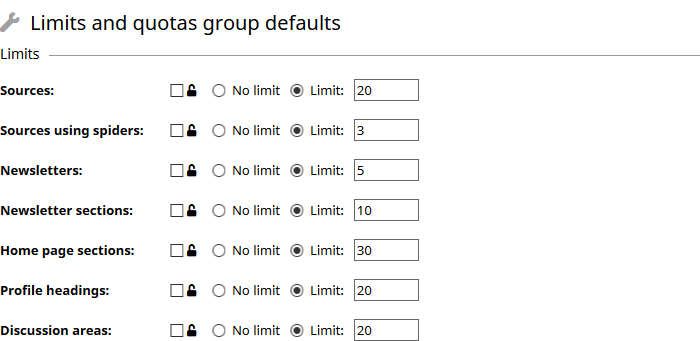
- To set limits on the maximum number of certain types of resource, content expiry and content quotas, select the Limits and quotas Setting maximum sizes will prevent abuse of groups.
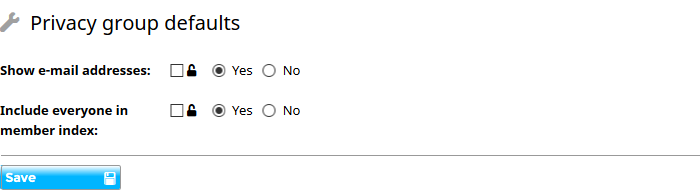
- To set whether other settings are available and what the default value should be, select one of the other pages. For example, if you want new members of a space to default to not having discussion messages emailed to them then choose the Member defaults page and change the Delivery methods allowed default to No email. If you wanted to stop attachments from ever being included with emails then you could change the Allow choice over receiving attachments and Default for new members settings both to No. If the box next to lock symbol beside a setting is checked then group administrators will be prevented from altering that setting.
Privacy
When used in team environment there is usually no issue with making available information about users and their contact details. When used as a public service on the wider Internet there may need to be additional controls.
- You can control whether email addresses are shown to ordinary users outside a blog or space using the setting on the Appearance system settings page.
- Within a blog or space, you can control whether email addresses are shown using the setting on the blog or space Privacy settings page.
- You can control whether users can view the user index and user profiles. In the Permissions settings page for Users, if you give the Registered user role permission to View users then users who are registered in the system and are logged in will be able to view the user index. In the Permissions settings page for User Profiles, if you give the Registered user role permission to view profiles then users who are registered in the system will be able to view profiles either from the user index or by following a link to a user’s profile from elsewhere. If a user has only profile view permission but not user view permission then they can only view user profiles that are linked from elsewhere.
- Within a space, you can control whether everyone is listed in the member index or just those that have chosen to fill out profiles using the setting on the space Privacy settings page.
Administration activities
Users
Users can be managed from the user index by selecting Users from the system-level navigation bar.
Users that are deactivated and no longer have access to the system are shown with their names striked through. If you wish to deactivate a user direct from the index then select the checkbox next to their name and choose the Deactivate button.
To edit a user, select the Edit button next to their name when hovering over the user or choose the Edit user button on their profile page. The edit form will allow you to change all the properties of a user and to reactivate a deactivated user.
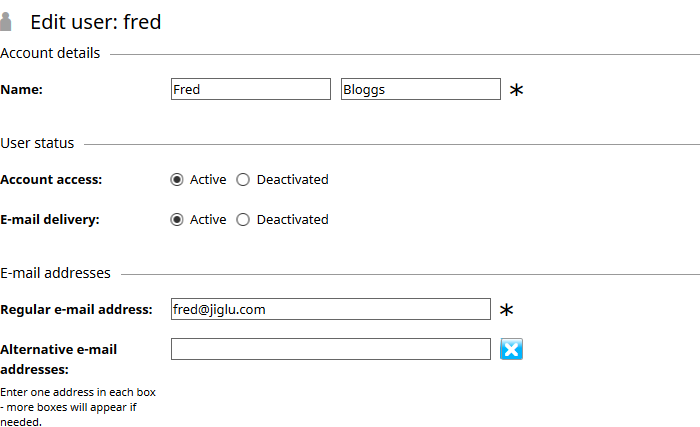
If e-mail to a user has not been able to be delivered for a period of time then their e-mail delivery may be deactivated. Users will be told when this has happened and can either reactivate their e-mail delivery themselves or you can change it for them on the user edit page.
If a user has forgotten their password and you are not using an external LDAP server then normally they will be able to follow a link from the log in form that will send them an e-mail containing a link that will let them change it. If they are unable to do this themselves then from the user profile page you can either send them the e-mail to change their password using the Send password button or you can change their password manually using the Password button. Note that if a user is a system administrator then for security reasons it will not be possible to send them a link so they can get a new password and another administrator will change it instead.
If two-factor authentication is in use and a user has lost their secret key then you can clear the existing key by choosing the Clear key button. They will then be able to generate a new secret key to use with Google Authenticator or a similar authentication device.
You can also modify the content of a user’s profile using the Edit profile button.
Tasks
When new users or groups need to be approved a task will be created for all the users that have the right to action the task. Tasks will be shown in a section on your My radar personal home page or you can select the pop-up menu on your name at the top right of each page and choose the My tasks option. If you have opted to receive them, you can also get email notifications of new tasks while outstanding ones will be shown in your daily newsletter.
Audit trails
The system has an activity log, letting you see who has made what changes. This also includes activities that the system itself has carried out. You can view the activity log either by going to the system settings and choosing the System activity log option or through one of the View the activity for… shortcuts on index pages in the space.
System status
You can view the real-time status of activities taking place in the system by going to the system settings and choosing the System status option. This shows four or five sections depending on current activity:
- Agent workloads – current background events that are awaiting processing. Except when high activity events like downloading external sources are taking place, the number of events should be small. If it is regularly higher then it usually indicates that the size of the event handler pool will need to be increased. If the numbers do not decline then there may be a problem in an event handler and the system logs should be checked to see what has happened.
- Asynchronous jobs – background jobs that either run at a regular interval or at a particular time each day. If a job has failed or it is found to be running continuously then the system logs should be checked to see what has happened.
- Processing queues – queues of incoming and outgoing email messages and incoming items from external sources. If these numbers remain above zero and do not decline then the system logs should be checked to see what has happened.
- Source spidering – for sources in monitors that rely on spidering external sites, the current state of this activity. This section is mainly to give system administrators an overview of this resource-intensive activity across all the monitors.
- Active sources – current feed and source downloading activity, with the current number of items processed and their status. Feeds will normally download very quickly but spiders may take a considerable time to complete their initial operation. If the numbers do not change then it may indicate a problem and the system logs should be checked to see what has happened.
The system logs are low-level logs of mostly exceptional events that have occurred within the system. On a UNIX system they will normally be found in /var/log/jiglu.
The system status is automatically refreshed every ten seconds.