Introduction
Spaces are where Jiglu users collaborate with each other. They bring together a group of people for a common project – perhaps from the same work team – or with a common interest – perhaps domain experts across different work teams or organisations. Each space has its own set of members and has controls over what they are allowed to see or do.
There are four types of content – what in Jiglu are called contributions – that a space holds in different sections:
- Discussion. Discussion messages are threaded conversations between members, available both on the web site (like a web forum) and on email (like a mailing list).
- Knowledge. Knowledge entries are where useful information and documents are captured for the long term. This section operates as a wiki, making it easy to link from one entry to another.
- Talk. Instant messages enable live chats to take place between members. Documents can also be quickly shared just by dragging and dropping them onto the talk page.
- Sources. Source items are content from external systems brought in on RSS feeds.
Spaces are just one kind of group in Jiglu. There are also blogs (which may be better for one-to-many communication) and monitors (for working with and analysing different kinds of external content).
Creating a space
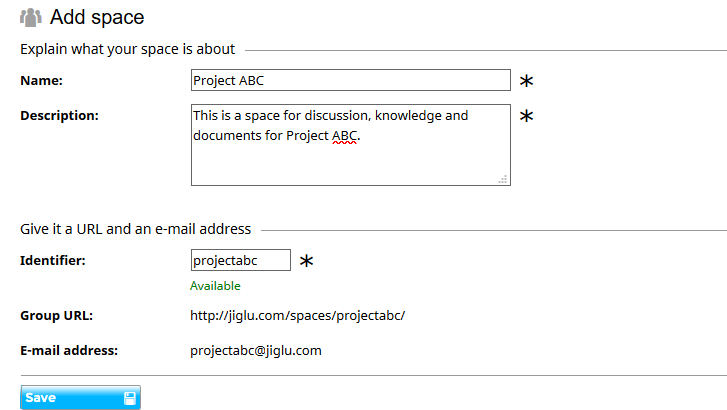
Creating a new space is easy. From your Radar home page, choose the Spaces tab and then select the New button. The space will need a name and a description – these can be changed later if needed. It will also need a short identifier, used to give the space its email address and URL. This identifier cannot be changed after the space is created.
Depending on system policies, there may be restrictions on starting a new space. If you do not have the right to add a new space then the New button will not appear on the Spaces index. New spaces may also require approval first from a system administrator, in which case you will have to wait before continuing.
If approval of new spaces is not required, you will next be taken to a page where you can choose either a template on which you wish to base your space or what access you want to allow to the space.
Templates allow spaces to reuse the settings of other spaces. For example, there could be a template for a space used solely for email announcements from its administrators or one that puts in place moderation of all knowledge entries and switches off instant messages. Applying a template will change the permissions, workflow approval and visual style of a space.
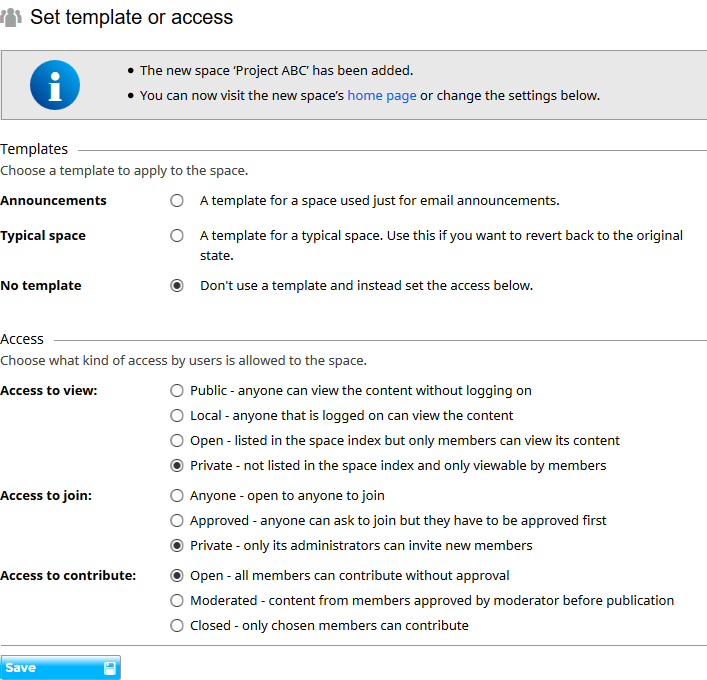
Rather than use a template, you can instead start by choosing who you want to be able to view the space, who is allowed to join and who is allowed to contribute. In a system with no templates (such as a brand new installation) this will be the only option. You might want to start by making a space private so you can configure the settings to your liking before opening it up to other users.
If new spaces must first be approved by a system administrator then following approval you can instead go to the space settings to choose a template or set the access.
Customising your space
Jiglu offers considerable control over how each space operates. A new space will be created with default settings that work for the average smaller-sized team. If that is fine for you then you can get started immediately, though you should read on about inviting people to join.
When you need greater control or you want to do things in a different way, go to the space settings by choosing the Settings tab.
There are up to seven areas that can be considered:
- Appearance - how the group looks.
- Home page- any special information to highlight to members on the space’s home page.
- Access and permissions- what types of resources are available to different kinds of member.
- Workflow- whether new content needs to be approved before publication.
- Members- what emails they get and what to capture in their profiles.
- Newsletters- email newsletters that members can subscribe to keep them updated.
- Other settings- dividing up discussions and subscribing to feeds.
Categories of settings that are not so commonly used can be found under the Advanced settings sub-tab. Note that depending on system policies some settings categories may not be available and some individual settings may also be locked by system administrators so group administrators cannot change them.
Appearance
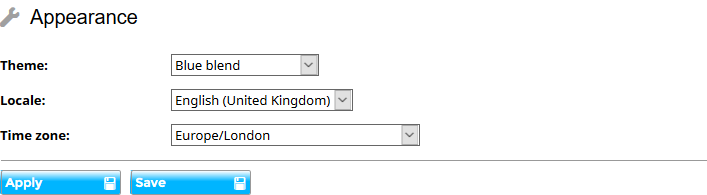
If system policies allow, spaces may change their look. There are two main settings categories that affect the look of every page:
- Appearance- here you can choose from a number of different themes, changing colours and other styling.
- Banner images- here you can upload a specific banner image for the top of each page or a specific icon for the space.
Home page
Each team has its own way of working and may use different features of a Jiglu space. You can configure the home page of the space to highlight the information that is most valuable to its members by going to the Home page category.
When viewed on a desktop computer the space home page will have three columns, with main information in a centre column and subsidiary information in side columns. On a mobile device where there is not enough room the three columns will be shown in turn as one column. A new space will come with a standard layout, but you can easily add new sections of different types, modify existing sections or drag them to a new position on the page.
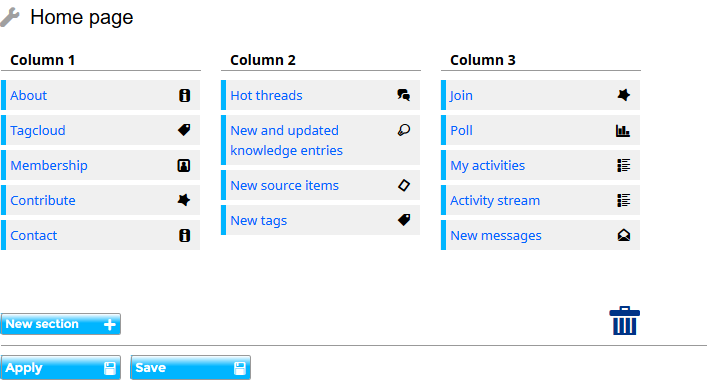
For example, if you want to have a notice that appears to everyone then you could add a new text section. You can choose a title for it and enter the text that you want users to see, including links to elsewhere if needed.
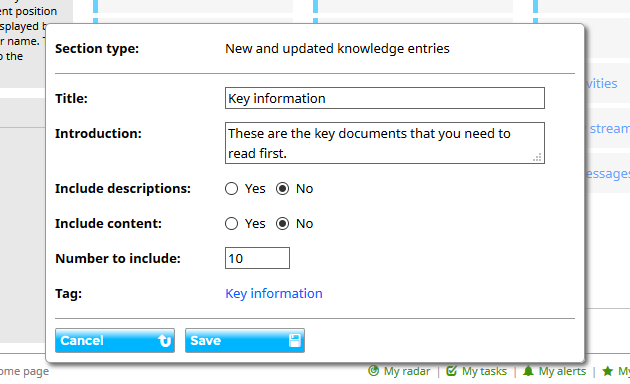
There may be certain information or documents that you want people to be able to easily see. The easiest way of doing this is to create knowledge entries for them and then tag them with a particular tag, for example ‘Key information’. You can then add a section to the home page to show only knowledge entries that have that tag.
There are a number of other ways of configuring home page sections and more information can be found in the home page settings help page.
Access and permissions
If you didn’t choose a template when you created your space then you will already have decided on the access choices for your space. If you want to change them then go to the Access category in the space settings.
The Access page provides a simple way to control who can do what in a space. However, there is also the option to decide exactly who can do what to what kinds of resources in the space. For example, you might not want to allow instant messages in a space or you might want to only allow space administrators to start new threads. You can do this in the Resource permissions settings category found in the Advanced settings index page. However, note that it is possible to change permissions in a way that will prevent any meaningful use of the space. For example, you shouldn’t stop the group administrators from editing the space or group members from being able to view tags.
Each permission is made up of three things:
- A resource type, such as discussion messages or group members. Each resource type has its own page in the Resource permissions settings category.
- A role that has been assigned to a member. Many roles are built in, such as whether a member is an administrator of a group. Some are given to a member at a particular time, such as whether they originally created the resource. A system may also have roles that have been created specially by its administrators.
- An operation to carry out on resources of a particular type, for example being able to view or delete it. Not all operations are available on every resource type.
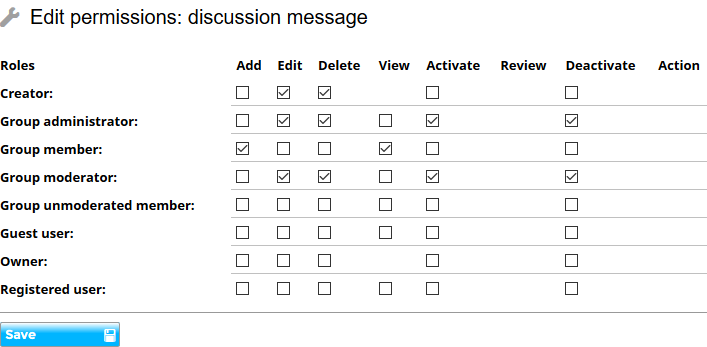
The two most common things you will want to do with permissions are to turn off a particular kind of contribution so it can’t be viewed and to limit who can create a particular kind of contribution.
For example, if you don’t want to permit instant messages in a space then go to the Instant messages page in the Resource permissions category and remove the View permission from every role. Without the view permission a user will not be able to carry out any other action.
If you only want space administrators to be able to start new discussion threads then go to the Discussion threads page in the Resource permissions category and remove the Add permission from all the roles and add it to the Group administrator role.
There are other examples of changing permissions to accomplish particular things in the Configuring Jiglu space on the support site.
Workflow
Workflow is what is allowed to be done to a particular type of resource over its life. For example, a new knowledge entry may require approval from administrators before it is published, who might send it back to its author if more work on it is needed. After it has been published for some months it may then need to be checked to see if it is still valid and can then be deleted if it is not.
In a space, discussion messages, discussion threads, polls, knowledge entries, tags and members all use workflow. Some have simple workflow, for example whether users who ask to join a space must be approved before they become members. Others are more complex. For example, discussion messages have several qualification settings to ensure when a message arrives via email that it is suitable for distribution by not being too large and not having been sent to too many recipients. There is additionally the ability to restrict what attachments are allowed, requiring approval when one is contributed whose media type is not allowed.
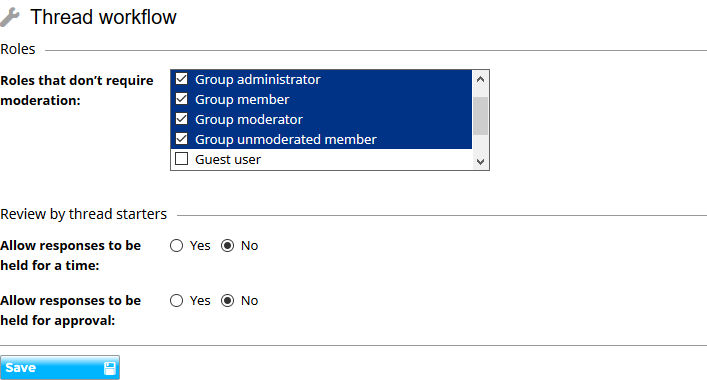
The workflow for discussion messages, discussion threads and knowledge entries also works in conjunction with a member’s roles, allowing some members to bypass the approval stage. For example, when someone first joins a space you might not be sure how good their contributions will be so you want to manually approve everything they write. However, there will also be members that you explicitly trust so you want their contributions to be published immediately. This can be accomplished by configuring the workflows to require approval of someone with a Group member role but not a Group unmoderated member role and then assigning the Group unmoderated member role to those people you trust.
There are other examples of changing workflows to accomplish particular things in the Configuring Jiglu space on the support site.
Members
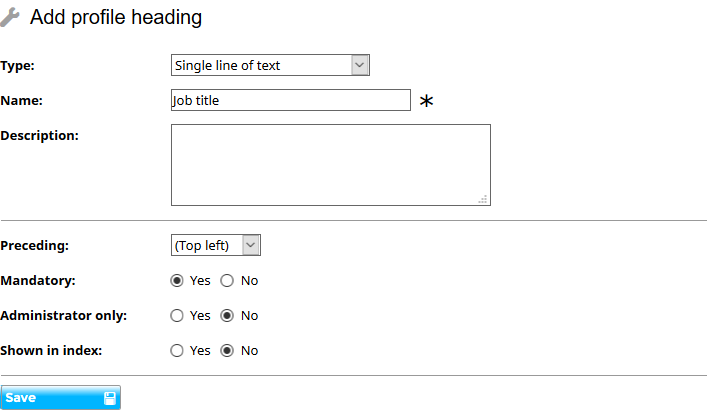
Within a space there may be additional information that you would like to capture in members’ profiles, for example what their involvement is in a particular project. You can do this by going to the Profile headings settings category and adding a new heading under which you want them to add information.
There are a number of different types of heading, from simple lines of text to multiple choice entries. You can also choose whether to have information only set by an administrator and whether to show it in the member index as well as on the profile page.
There are also some other settings categories affecting members:
- Member defaults- here you can choose what email people receive by default. If you want your members to always opt-in to receive discussion messages as email then you can change that here.
- Privacy- here you can decide whether email addresses of members are shown on the website and if everyone gets shown in the member index or just those that have filled out profile information. These are likely to be most useful for public spaces.
Newsletters
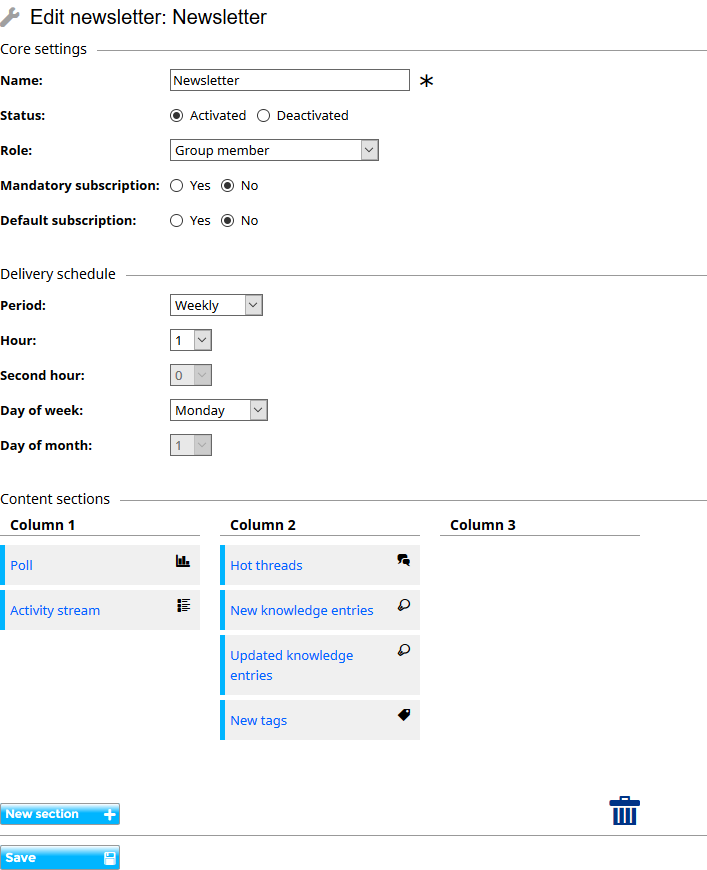
Not everyone may be regularly checking in to see what is new. So you don’t leave them behind you may want to set up one or more email newsletters for the space.
Each space comes with a default weekly newsletter, called ‘Newsletter’, providing updates of what new contributions have been made. However, it’s really simple to add additional newsletters, which can be published daily, weekly or monthly with sections of content chosen similar to the space home page. Newsletters can also be targeted at particular roles so, for example, the administrators of the space could get a daily update of new members which ordinary members might not be interested in.
Other settings
The Discussion areas settings category lets you divide up discussion threads into particular sub-areas. This can be useful if you have a very busy space which is not suitable for dividing into separate spaces. Each area will have a name and a description and you can choose the order in which they appear in the index.
The Sources settings category lets you subscribe the space to external RSS feeds. The content from these will appear in the Sources tab and can also be included as a section on the home page or in a newsletter.
Inviting people to join
Once the space is configured how you like it, you can add members to it. Going to the Members tab you will find one or both of the following buttons:
- Invite – here you can invite new members to join the space by specifying their email addresses. You can also include a short message to include with the invitation. If they are already users of the system then they can confirm either by actioning a task or by clicking on a link in the invitation email. If they are not yet users of the system and external invitations are permitted then they will be sent an email with a link that allows them to register on the system and join the group.
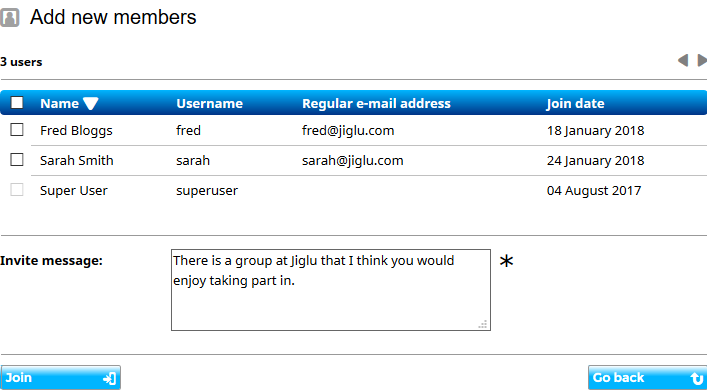
- Add users – here you can add new members by selecting them from the user index. Note that this will only be available if you have permission to view the user index.
You can see the status of past invites by selecting the View recent member invites option from the Actions section on the left of the member index. This will show who has been sent an invitation and by who, together with whether or not it has yet been accepted.
Administration activities
Tasks
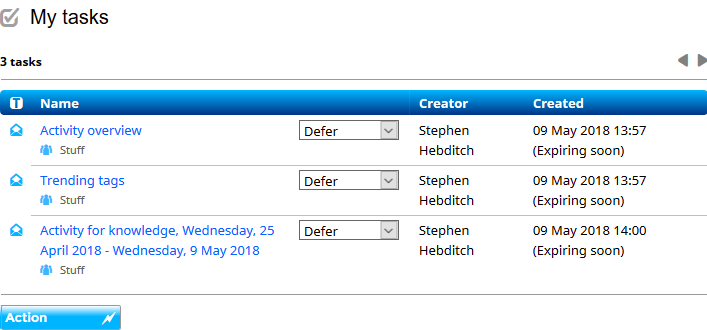
When contributions or new members need to be approved a task will be created for all the members that have the right to action the task. Tasks will be shown in a section on your My radar personal home page or you can select the pop-up menu on your name at the top right of each page and choose the My tasks option. If you have opted to receive them, you can also get email notifications of new tasks while outstanding ones will be shown in your daily newsletter.
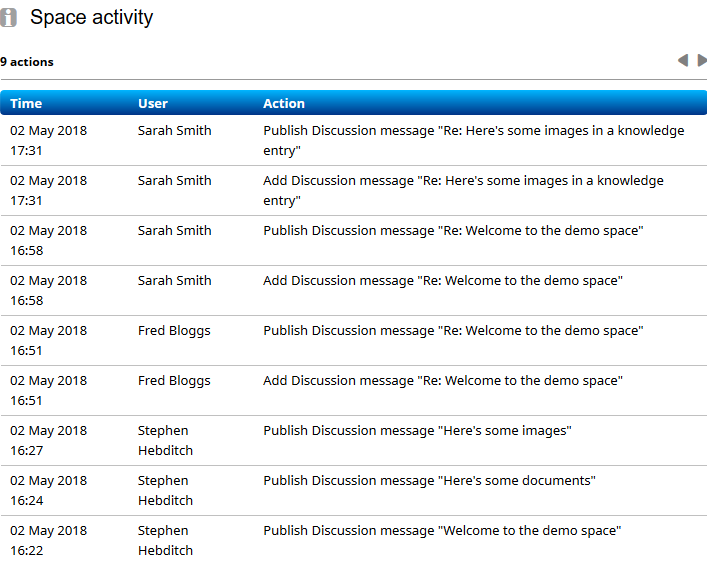
Audit trails
Each space has its own activity log, letting you see who has made what changes. This also includes activities that the system itself has carried out. You can view the activity log either by going to the space settings, choosing the Additional options tab and then Space activity log or through one of the View the activity log for… shortcuts on index pages in the space.
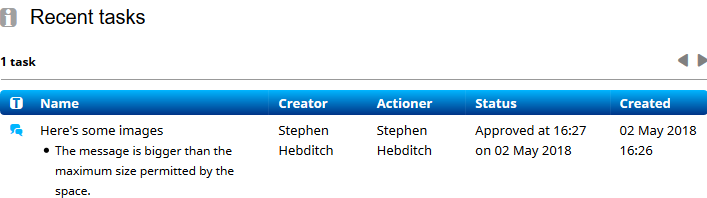
To view recent tasks in the space, with information about who created each task and who actioned it (if it has been actioned), go to the space settings, choose the Additional options tab and then Recent tasks.
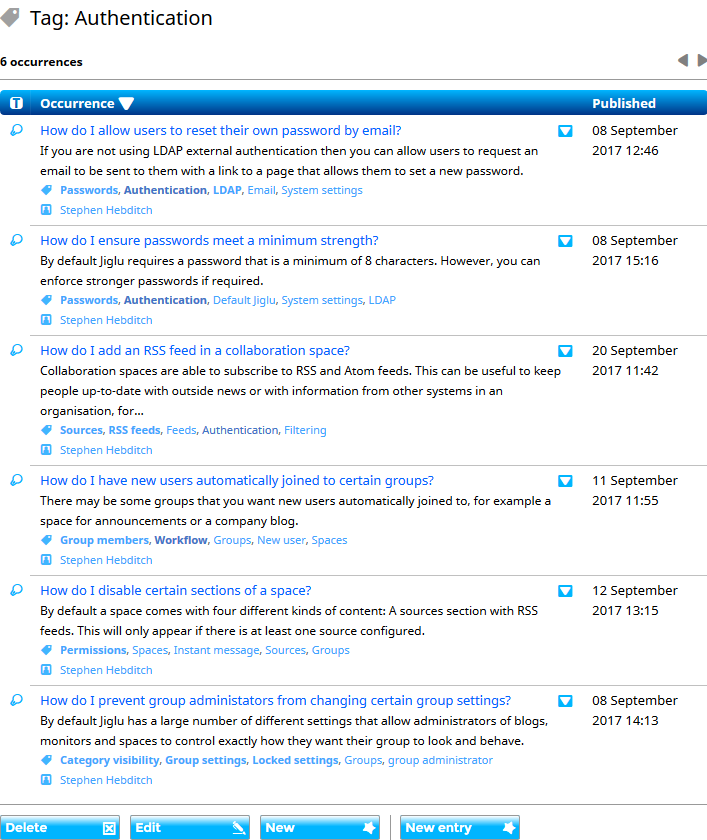
Tags
Each space has its own set of tags, used to classify similar content. Tags may be created and applied manually when adding or updating a knowledge entry, automatically for all types of contribution by analysing their content or they can be brought in externally for items from a source. There are also some tags used to classify other tags, for example the authors of attached documents or the association between two tags that share a connection.
You can see all the tags in use in the space by selecting the Discovery tab. If the system has automatically created a tag that is not useful then it can be deleted. You can also add, edit and merge tags here.