Introduction
Monitors are for working with and analysing different kinds of external content. They allow you to bring in content from feeds, through scraping websites or over HTTP REST or Java APIs. There are then features for content analytics, letting you see content items through tags or sentiment and track them over time. Each monitor has its own set of members and has controls over what they are allowed to see or do.
Monitors are just one kind of group in Jiglu. There are also spaces (for collaboration between users) and blogs (which may be better for one-to-many communication).
Creating a monitor
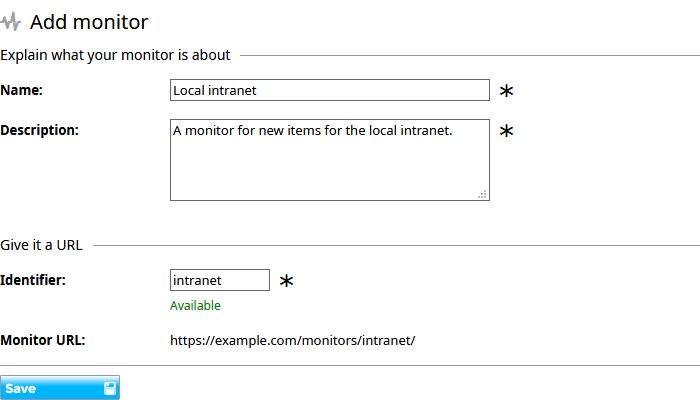
Creating a new monitor is easy. From your Radar home page, choose the Monitors tab and then select the New button. The monitor will need a name and a description – these can be changed later if needed. It will also need a short identifier, used to give the monitor its URL. This identifier cannot be changed after the monitor is created.
Depending on system policies, there may be restrictions on starting a new monitor. If you do not have the right to add a new monitor then the New button will not appear on the Monitors index. New monitors may also require approval first from a system administrator, in which case you will have to wait before continuing.
If approval of new monitors is not required, you will be given the option to go to a page where you can add the first content source. If new monitors must first be approved by a system administrator then following approval you can instead go to the monitor settings to set the access.
Adding sources
Jiglu offers a number of ways to monitor external content:
- From an RSS or Atom feed. If the feed offers only a summary of the content then it can be set to download the full content from the linked page.
- Monitoring a particular web page for URLs that match a particular pattern. This can be useful when a site offers a page for new article updates but no feed.
- Spidering a web site. Either a whole site can be crawled by the spider, just those pages beneath a particular path or those whose URLs match a particular pattern.
- Running an OpenSearch query on a website, either with results from a feed or taken from a web page.
- Adding items using the Atom Publishing Protocol HTTP REST API or the Java API.
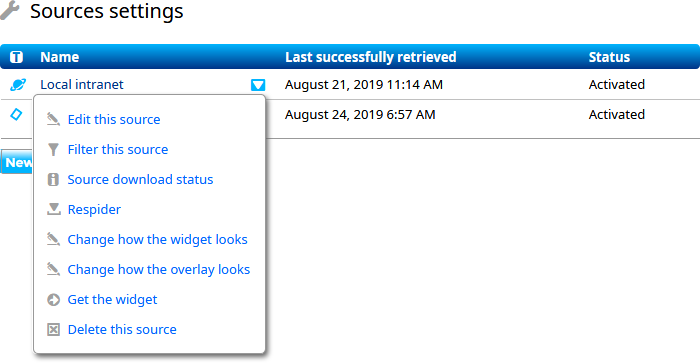
To add a new source follow the link to do so when you first create a monitor or for an existing monitor go the Settings tab, choose the Sources option and then the New source button. You will now be asked to enter the URL of the source that you wish to add and then select the Check button.
What happens next will depend on the URL that was entered. A request will be made to that page to see what options are available for bringing its content into the site and the form will be updated to reflect this.

If the URL that you entered is for a resource that requires authentication then the page will display fields for you to enter the username and password. Selecting Check again will then update the form to reflect the details that are now available after successful authentication.
Feed sources
Feeds are the simplest to add to a monitor. Just enter the URL of the feed you want to add, select the Check button and then if you don’t want to do anything special just hit the Save button at the bottom of the form.
If you enter the URL for the home page of a website and that page supports feed discovery then you will also be able to add a feed this way, although this has become a less common feature than it once was.
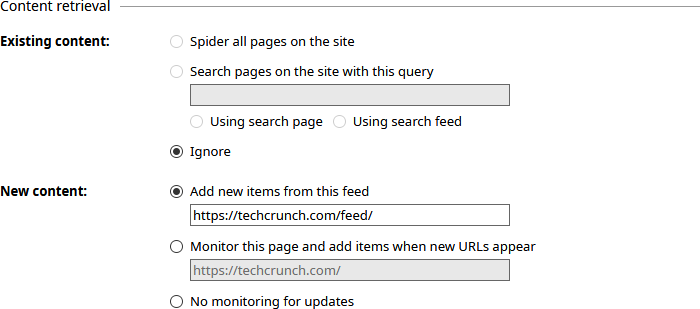
Jiglu supports most common feed types, including RSS 1.0, 2.0 and Atom 1.0, along with some of the standard modules that extend them, such as MediaRSS.
Naming
By default the name and description for a feed source will be taken from the details supplied by the feed and will be updated should they change. If you want to change these to your own preferred name and description then change the Update name automatically option to Off.

Downloading and tagging
While some feeds offer the full content of the article they are for, others only provide a summary or a short extract from the start of the piece. If this is the case and you would like the full content to be tagged by Jiglu then change the Download full content option to Yes.
Many feeds will also supply their own tags (sometimes called keywords or categories), which by default Jiglu will also add as tags with a Source metadata creation type. Sometimes these tags may not be useful, perhaps overwhelming the tags in the monitor due to their quantity or causing problems because their quality is not good. If this is the case then you can change the Use source’s own tags option to No.
Web page monitoring
When a web site doesn’t have a feed but still has a page on which updates are posted you can use web page monitoring. Enter the URL of the page to monitor and select the Check button.
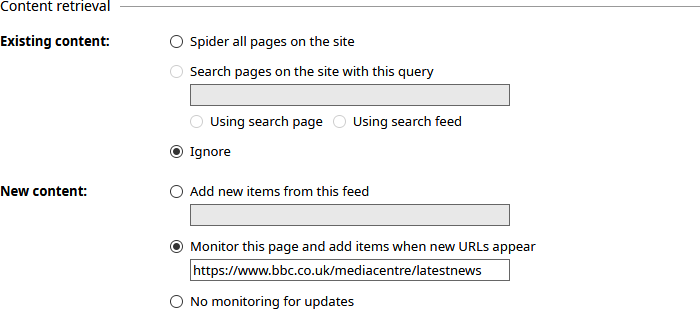
Because the page will almost certainly contain links to parts of the site that you are not interested in, you will need to add one or more article URL patterns. For example, if you are monitoring /mediacentre/ and only want to include URLs from the latest news section then you might use a pattern of /mediacentre/latestnews/. More sophisticated patterns can also be used as long as they are valid regular expressions, for example /mediacentre/latestnews/201[89]/. The spider will also ignore creating items for links that appear to be part of the standard page furniture, such as appearing in a header or footer.
Downloading and tagging
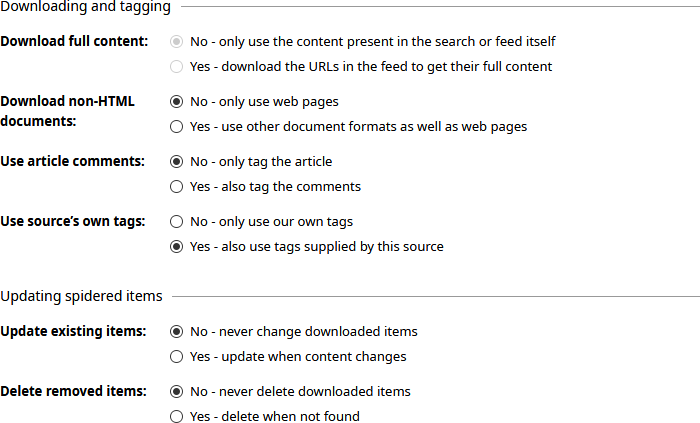
Normally you will only want to retrieve the content of web pages that are linked from a page being monitored. However, there might be some cases where you also want other document types, such as PDF format files. If this is the case then change the Download non-HTML documents option to Yes.
Some pages, such as blogs or newspaper sites, may have comments from readers underneath the main article. Normally Jiglu will try and avoid these when tagging the content but if you wish to have them tagged as well then change the Use article comments option to Yes. Note that while the system tries to identify the text of comments this relies on various heuristics to do so and it may not always get it right.
Like feeds, you also have the option of whether to use tags that are supplied by the site. If you do not wish to do so then change the Use source’s own tags option to No.
When content changes
Normally when an item has been added its content will not be updated again and it will only be removed according to the expiry rules, described later. If you want to have items checked for updates, with their details and tags updated according to the latest version of the page, then change Update existing items to Yes. If you want to have items deleted when they disappear from the site that is being monitored then change Delete removed items to Yes.
Spidering a web site
If you are interested in the existing content on a web site, not just new pages, then you can spider a site. Enter the URL of the site or part of a site that you wish to spider and select the Check button.
Note that spidering can be very resource intensive and has the potential to add a massive number of items in a monitor and use up a large amount of bandwidth in doing so. A system setting controls how many items may be downloaded from each source, set at 4,000 by default, which may be changed globally or for individual monitors. There may also be a limit imposed by the product licence key.
Choosing what to download
Like web page monitoring, you will almost certainly want to limit which parts of the site you are interested in by setting article URL patterns. For example, if you are spidering /mediacentre/ and only want to include URLs from the latest news section then you might use a pattern of /mediacentre/latestnews/. More sophisticated patterns can also be used as long as they are valid regular expressions, for example /mediacentre/latestnews/201[89]/. The spider will also ignore creating items for links that appear to be part of the standard page furniture, such as appearing in a header or footer.
Note that the article page pattern only affects what items are created – everything that can be found under the URL that you entered for the source will be downloaded so that every matching page can be found. If you do not include an article URL pattern then the system will use heuristics to automatically determine if each page downloaded is an article or an index page but on some sites this will be less reliable.
Updating with new content
When you have chosen to spider a site, it will be periodically respidered to check for any new pages that have been published. You can also check for new content using a feed or by monitoring a page for updates, as described in the previous two sections.
Downloading and tagging
Normally you will only want to retrieve the content of web pages that found on a site being crawled by the spider. However, there might be some cases where you also want other document types, such as PDF format files. If this is the case then change the Download non-HTML documents option to Yes.
Some pages, such as blogs or newspaper sites, may have comments from readers underneath the main article. Normally Jiglu will try and avoid these when tagging the content but if you wish to have them tagged as well then change the Use article comments option to Yes. Note that while the system tries to identify the text of comments this relies on various heuristics to do so and it may not always get it right.
You also have the option of whether to use tags that are supplied by the site. If you do not wish to do so then change the Use source’s own tags option to No.
When content changes
Normally when an item has been added its content will not be updated again and it will only be removed according to the expiry rules, described later. If you want to have items checked for updates, with their details and tags updated according to the latest version of the page, then change Update existing items to Yes. If you want to have items deleted when they disappear from the site that is being monitored then change Delete removed items to Yes.

Content extraction
For each article page that is processed, Jiglu needs to get hold of the title of the page, a short description, the date that it was published and the main content of the article, so that the content can be tagged. It will also try and get hold of any tags and the location of a thumbnail image for the page.
If possible it will use page metadata for the title, description, publication date, tags and thumbnail image, supporting schema.org, OpenGraph, Twitter Cards, IPTC rNews and common HTML metadata properties. If these are not available then it will instead try and find the title and publication date from the content of the page, looking for likely elements such as page headings. For the content of the page it will use a number of heuristics, trying first to use schema.org markup to find the main text and falling back to scoring likely elements.
If Jiglu’s spider is not able to do a good job of locating this information, perhaps because the site is very old, then you can help it by supplying CSS selectors telling it where to find the title, publication date and main content. For example, if you know the main content is in the sole article element on the page, then use article as your selector. If you know it’s in an element with an id of mainContent then use #mainContent as your selector.
OpenSearch queries
If you are interested in the results of a search of a website then you can send a search query to a site that supports the OpenSearch standard. Enter the URL of the site or the OpenSearch descriptor URL and select the Check button.

When OpenSearch is available, the Search pages on the site with this query choice will become available for the Existing content option in the Content Retrieval section. Here you can enter the search query and, when available, choose whether to retrieve the results using a search page or a feed. Search pages are more common than feeds for OpenSearch but are likely to require some more configuration of the source, such as setting the Article URL patterns as described earlier.
OpenSearch works by specifying a template for the URL to retrieve, which will include the search terms and possibly the page number that is to be retrieved. If the template includes a page number then subsequent pages of results will also be downloaded by Jiglu, up to a default maximum of 20. If required, this maximum can be changed in the External lookup category of the system settings.
Under the covers, Jiglu uses a feed or a page monitor to retrieve the search results and the options that are available for the source will be the same as those for these types, as described above.
API
As well as being able to automatically retrieve content from a number of external sources, Jiglu has APIs available for you to manually add items to a source. More information about using these APIs will be available shortly in the developer support space.
Editing sources
Once you have added a source you can easily make changes to its configuration, such as changing a source that just uses a spider so it adds new items of content from a feed. The options available to you will change depending on what methods you choose for adding new and existing content.
Item expiry
When new items are added to a source, older ones will be purged to make room for the new content. This is controlled in two ways:
- There is a limit on the number of items that is permitted. This can be set individually for each source and there is also a group default setting in the Limits and quotas category that controls the maximum – initially set to 4,000 items for a monitor. The maximum value allowed is also controlled by the licence key, with a maximum of 4,000 items for a non-premium licence.
- There is a limit on how old items are allowed to be. This can again be set individually for a source and there is also a group default setting in the Limits and quotas category that controls the maximum – initially set to no limit for a monitor.
When adding or editing a source, setting either of these values to 0 will use the default for the group.

When items are created their publication date will be checked against the maximum age allowed. If an entry from a feed or a page that is crawled by the spider is found to be too old then it will be rejected and the item will not be created.
When the spider is crawling pages it will stop once it hits the maximum limit on items for a source. Note that this only applies when crawling existing content on a site, not when creating new items from a page being monitored for updates, although that will still be subject to that limit for new items created.
When a feed has been successfully downloaded or a spider has completed its work then older items will be purged from the source. First, all the items that are now older than the maximum age permitted will be deleted. Then the oldest items that take the source above the maximum limit of items are deleted.
Jiglu widget
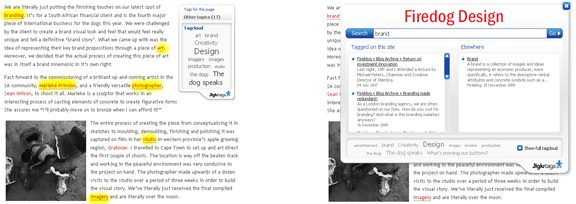
If you are using a monitor on a website that you operate, such as a local intranet, then you can use the Jiglu widget on its pages to allow users to see the tags for each page and explore further what content is available on that site or in the Jiglu system with the same tags.
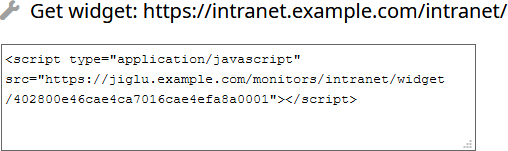
To do this you will first need to create a spider source, as described in the earlier section. Once you have done this and the spider has started downloading pages, from the sources index settings page choose the Get the widget option from the dropdown menu to the right of the source name. This will give you a small piece of JavaScript that you can place on the page where you want the widget to appear, typically in a sidebar.
Now when a user visits a content page on the website they will see in the widget what tags have been chosen for it by Jiglu. Links will also optionally be added to the main text of the article for these tags. Clicking on one of those tags will open up an overlay sub-window on the page where a user can see other pages with the tag and which groups have also referenced that tag in Jiglu.

If a user visits a page that has not yet been crawled by the spider then they will be told that tags aren’t yet available and the page will be crawled by the spider once it has finished any current work.
In order to fit in better with the styling used by the website, you can change the look of the widget and the overlay by selecting the Change how the widget looks or Change how the overlay looks options from the dropdown menu to the right of the source name in the sources index. These let you choose what colours are used, what sections are included in the widget and overlay and, for the widget, how it adds links to the main text of the article.
Customising your monitor
Jiglu offers considerable control over how each monitor operates. A new monitor will be created with default settings that work for most cases. When you need greater control or you want to do things in a different way, go to the monitor settings by choosing the Settings tab.
There are five areas that typically need to be considered:
- Appearance. How the group looks.
- Home page. Any special information to highlight to members on the monitor’s home page.
- Access and permissions. What access is available to different kinds of member.
- Newsletters. Email newsletters that members can subscribe to keep them updated.
Note that depending on system policies some settings categories may not be available and some individual settings may also be locked.
Appearance
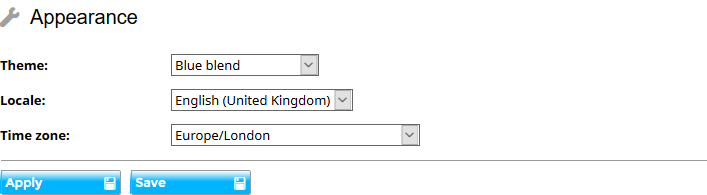
If system policies allow, monitors may change their look. There are two main settings categories that affect the look of every page:
- Appearance. Here you can choose from a number of different themes, changing colours and other styling.
- Banner images. Here you can upload a specific banner image for the top of each page or a specific icon for the monitor.
Home page
Each team has its own way of working and may use different features of a Jiglu monitor. You can configure the home page of the monitor to highlight the information that is most valuable to its members by going to the Home page category.
When viewed on a desktop computer the monitor home page will have three columns, with main information in a centre column and subsidiary information in side columns. On a mobile device where there is not enough room the three columns will be shown in turn as one column. A new monitor will come with a standard layout, but you can easily add new sections of different types, modify existing sections or drag them to a new position on the page.
For example, if you want to have a notice that appears to everyone then you could add a new text section. You can choose a title for it and enter the text that you want users to see, including links to elsewhere if needed.
There may be certain information or documents that you want people to be able to easily see. The easiest way of doing this is to create knowledge entries for them and then tag them with a particular tag, for example ‘Key information’. You can then add a section to the home page to show only knowledge entries that have that tag.
There are three types of home page section that are specific to monitors:
- Source highlights – this section shows the five latest items from a source with their summaries and thumbnails, plus the five subsequent items with just their titles.
- Tag activity chart – this section shows a chart with the activity for the number of items each recent day for a particular tag.
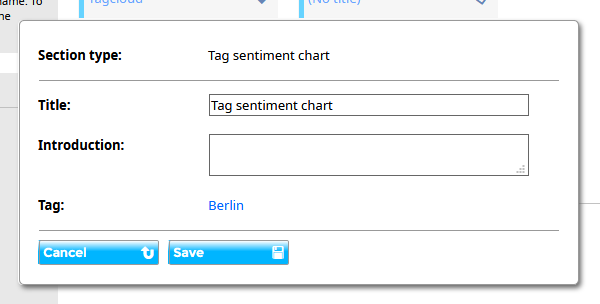
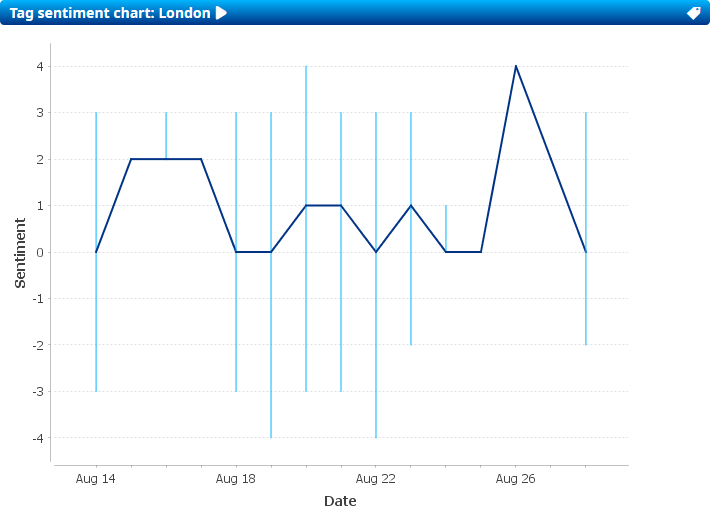
- Tag sentiment chart – this section shows a chart with the sentiment each recent day for a particular tag.
Generating charts will use up substantial resources so these sections should be used sparingly or the time it takes for the monitor home page to load will be long.
There are a number of other ways of configuring home page sections and more information can be found in the home page settings help page.
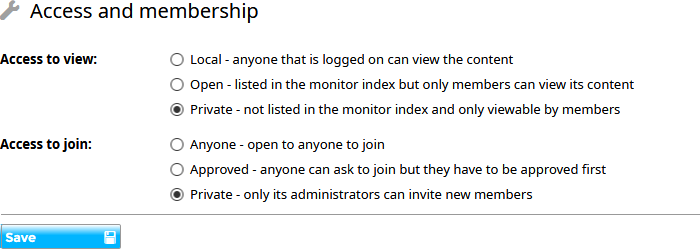
Access and permissions
To change what access users have to the monitor, go to the Access category in the monitor settings.
The Access page provides a simple way to control who can do what in a monitor. However, there is also the option to decide exactly who can do what to what kinds of resources in the monitor. For example, you might want to allow anyone who is a member to add or edit tags. You can do this in the Resource permissions settings category. However, note that it is possible to change permissions in a way that will prevent any meaningful use of the monitor. For example, you shouldn’t stop the group administrators from editing the monitor or group members from being able to view tags.
Each permission is made up of three things:
- A resource type, such as source items or group members. Each resource type has its own page in the Resource permissions settings category.
- A role that has been assigned to a member. Many roles are built in, such as whether a member is an administrator of a group. Some are given to a member at a particular time, such as whether they originally created the resource. A system may also have roles that have been created specially by its administrators.
- An operation to carry out on resources of a particular type, for example being able to view or delete it. Not all operations are available on every resource type.
There are examples of changing permissions to accomplish particular things in the Configuring Jiglu space on the support site.
Members
In a monitor the only setting that controls members is Member workflow – members are also the only kind of resource in a monitor that are subject to workflow. Here you can choose whether new members need approval and whether administrators will get notified when a member leaves.
Newsletters
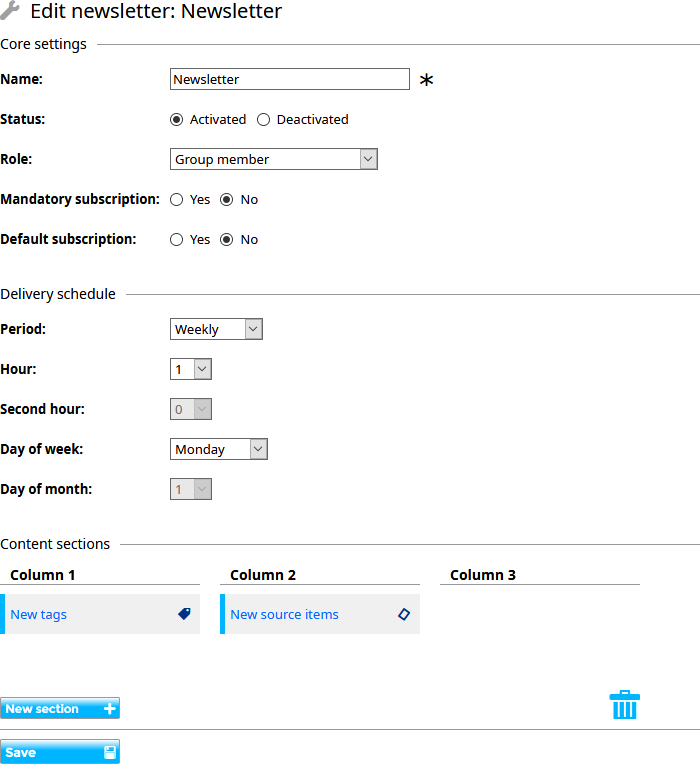
Not everyone may be regularly checking in to see what is new. So you don’t leave them behind you may want to set up one or more email newsletters for the monitor.
Each monitor comes with a default weekly newsletter, called ‘Newsletter’, providing updates of what new contributions have been made. However, it’s really simple to add additional newsletters, which can be published daily, weekly or monthly with sections of content chosen similar to the monitor home page. Newsletters can also be targeted at particular roles so, for example, the monitor administrators could get a daily update of new members which ordinary members might not be interested in.
Inviting people to join
Once the monitor is configured how you like it, you can add members to it. Going to the Members tab you will find one or both of the following buttons:
- Invite – here you can invite new members to join the monitor by specifying their email addresses. You can also include a short message to include with the invitation. If they are already users of the system then they can confirm either by actioning a task or by clicking on a link in the invitation email. If they are not yet users of the system and external invitations are permitted then they will be sent an email with a link that allows them to register on the system and join the group.
- Add users – here you can add new members by selecting them from the user index. Note that this will only be available if you have permission to view the user index.
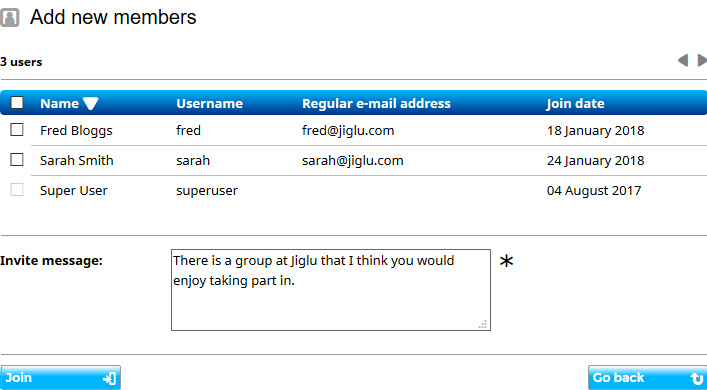
You can see the status of past invites by selecting the View recent member invites option from the Actions section on the left of the member index. This will show who has been sent an invitation and by who, together with whether or not it has yet been accepted.
Administration activities
Tasks
When new members need to be approved a task will be created for all the members that have the right to action the task. Tasks will be shown in a section on your My radar personal home page or you can select the pop-up menu on your name at the top right of each page and choose the My tasks option. If you have opted to receive them, you can also get email notifications of new tasks while outstanding ones will be shown in your daily newsletter.
Audit trails
Each monitor has its own activity log, letting you see who has made what changes. This also includes activities that the system itself has carried out. You can view the activity log either by going to the monitor settings and choosing the Monitor activity option or through one of the View the activity for… shortcuts on index pages in the monitor.
To view recent tasks in the monitor, with information about who created each task and who actioned it (if it has been actioned), go to the monitor settings and choose Recent tasks.
Tags
Each monitor has its own set of tags, used to classify similar content. Tags may be created and applied manually when editing a source item, automatically for all types of contribution by analysing their content or they can be brought in externally for items from a source. There are also some tags used to classify other tags, for example the authors of attached documents or the association between two tags that share a connection.
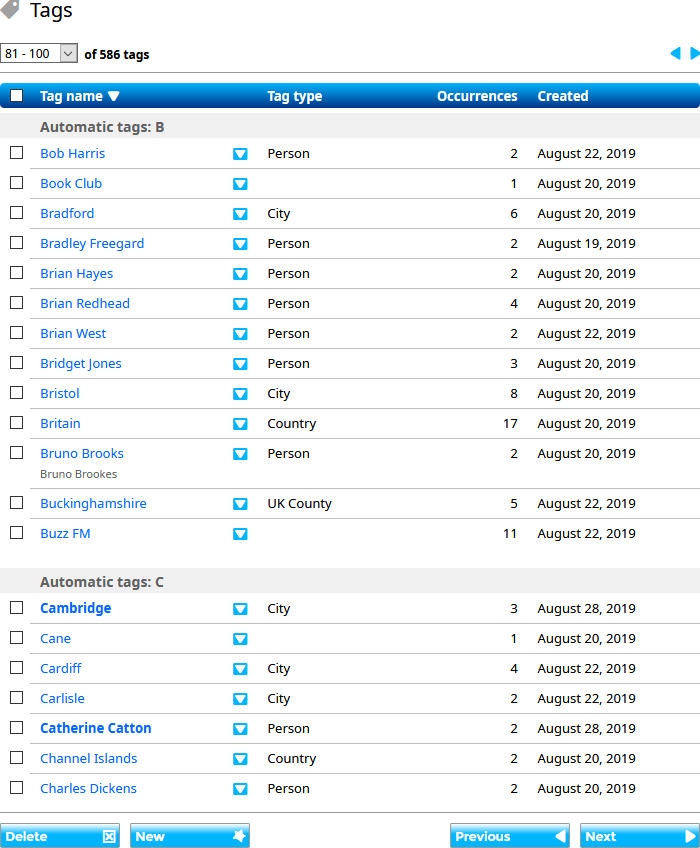
You can see all the tags in use in the monitor by selecting the Discovery tab. If the system has automatically created a tag that is not useful then it can be deleted. You can also add, edit and merge tags here.