There are four different kinds of invitation email that an individual can receive from Jiglu.
System invitation
This is the invitation that an individual will receive when they are not yet a user of the system but are invited to register. This invitation will be sent if you go to Users -> Invite users by email address.
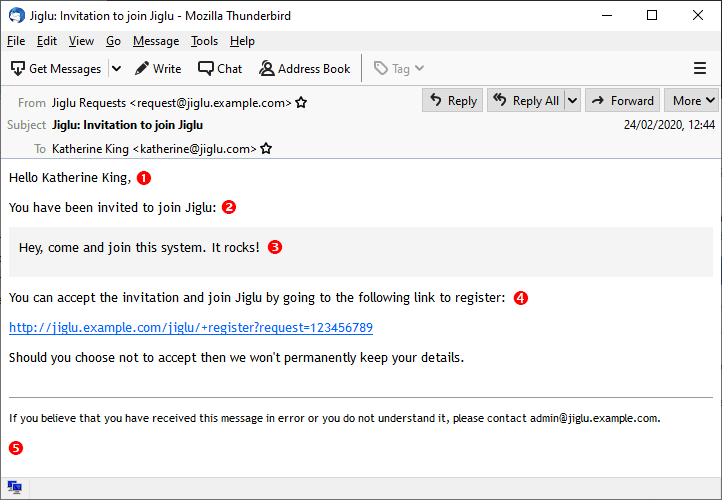
These are the elements that make up the invitation:
- This is the name of the individual being invited. If you did not include their name on the form after their email address then this line will not appear.
- This is the name of the system. You can configure this by going to System settings -> System identity -> System name.
- This is the invitation message that the person sending the invitation wrote. The default message can be configured by going to System settings -> User notifications -> Default personal invitation message.
- This is the standard text that gets sent with every invitation containing the URL where they can register. You can configure this by going to System settings -> User notifications -> System invitation message.
- This is the footer. The help part is not configurable. Beneath this can be a footer added to all emails from the system. This can be configured by going to System settings -> Email other processing -> Footer.
System invitation reminder
This is the reminder that an individual will receive when they are not yet a user of the system and have been invited to register but have not yet done so. Normally this will be sent three days after the original invitation was made.
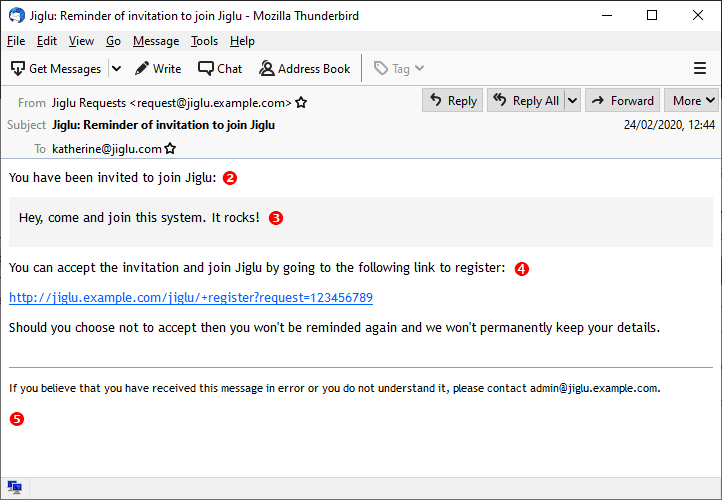
These are the elements that make up the invitation:
- This is the name of the individual being invited. If you did not include their name on the form after their email address then this line will not appear, as is the case here.
- This is the name of the system. You can configure this by going to System settings -> System identity -> System name.
- This is the invitation message that the person sending the invitation wrote. The default message can be configured by going to System settings -> User notifications -> Default personal invitation message.
- This is the standard text that gets sent with every invitation containing the URL where they can register. You can configure this by going to System settings -> User notifications -> Invitation reminder message.
- This is the footer. The help part is not configurable. Beneath this can be a footer added to all emails from the system. This can be configured by going to System settings -> Email other processing -> Footer.
Group invitation for a new user
This is the invitation that an individual will receive when they are not yet a user of the system but have been invited to register and join a particular group. This invitation will be sent if you go to Members -> Invite new members by email address or from a group home page choose the Invite someone to join option from the Membership section.
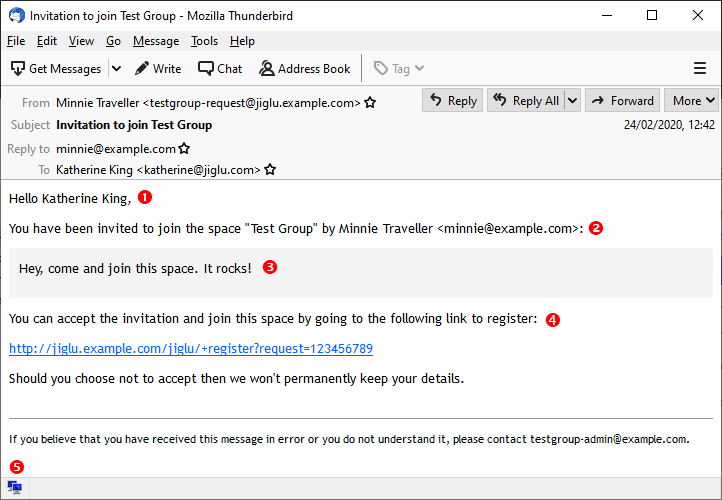
These are the elements that make up the invitation:
- This is the name of the individual being invited. If you used theInvite new members by email address form and did not include their name on the form after their email address then this line will not appear.
- This is the name of the group. You can configure this by going to Group settings -> General -> Name.
- This is the invitation message that the person sending the invitation wrote. The default message for a group can be configured by going to Group settings -> Advanced settings -> Member notifications -> Default personal invitation message. The default message that will be used for all groups that haven't set a specific message can be configured by going to System settings -> Group defaults -> Member notifications -> Default personal invitation message.
- This is the standard text that gets sent with every invitation containing the URL where they can register. You can configure this by going to System settings -> User notifications -> Group invitation message.
- This is the footer. The help part is not configurable. Beneath this can be a footer added to all emails from the system. This can be configured by going to System settings -> Email other processing -> Footer.
Group invitation for an existing user
This is the invitation that an individual will receive when they already a user of the system and have been invited to join a particular group. This invitation will be sent if you go to Members -> Invite new members by email address and use an address of an existing user, Members -> Add new members from the user index or from a group home page choose the Invite someone to join option from the Membership section and use an address of an existing user. Note that if any of these actions is carried out by someone with permission to activate users then the user will be made a member immediately and no invitation will be sent.
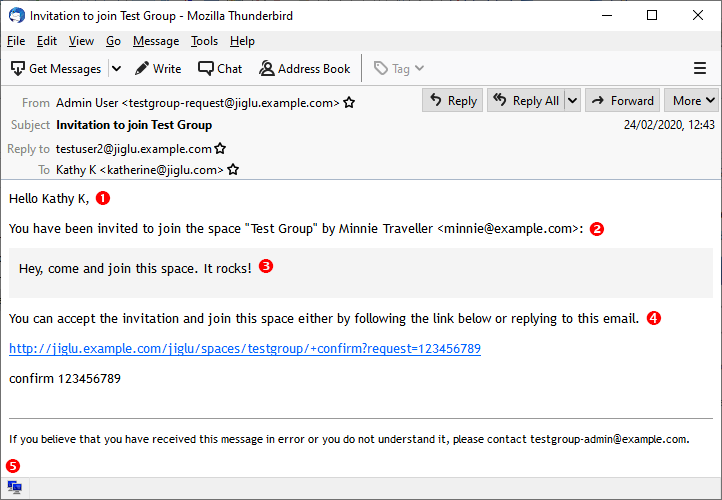
These are the elements that make up the invitation:
- This is the name of the individual being invited. This will be taken from their user details unless you entered a specific name on the Invite new members by email address form or the Invite someone to join form.
- This is the name of the group. You can configure this by going to Group settings -> General -> Name.
- This is the invitation message that the person sending the invitation wrote. The default message for a group can be configured by going to Group settings -> Advanced settings -> Member notifications -> Default personal invitation message. The default message that will be used for all groups that haven't set an individual message can be configured by going to System settings -> Group defaults -> Member notifications -> Default personal invitation message.
- This is the standard text that gets sent with every invitation with details of how to confirm. You can configure this by going to Group settings -> Member notifications -> Invitation message.
- This is the footer. The help part is not configurable. Beneath this can be a footer added to all emails from the system. This can be configured by going to System settings -> Email other processing -> Footer.